Sony Alpha A7R IV Review
Sony Alpha A7R IV Usability - How easy is it to use?
There is a distinct look to Sony mirrorless cameras. Each new full-frame model refines the same basic design which offers a good number of physical controls in a relatively compact form. Except for a grip that is now deeper on the Sony Alpha A7R IV, its body is rather squarish. While allowing a larger battery, this also provides a more comfortable and secure hold. The angular shape with slightly rounded edges gives this camera a technical rather than natural feel.
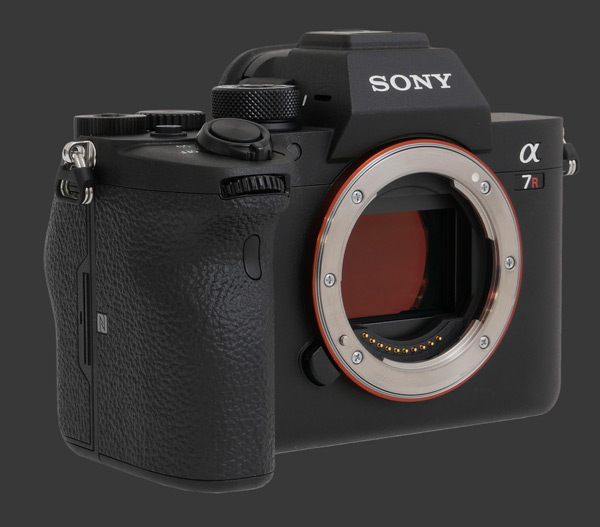
Sony are masters of miniaturization, always managing to fit more into smaller devices. The A7R IV with a lens mounted is nearly identical in size to an APS-C DSLR with an equivalent lens. The main difference is that the mirrorless is less deep, while the lens is longer and wider to accommodate a full-frame imaging circle. The camera itself is really dense and feels extremely solid. Even the LCD hinge, frequently a weak-point on modern cameras, appears sturdy.
This mirrorless camera is pleasant to hold. A deep indentation within the grip allows the camera to be supported by the fore finger. The body of the A7R IV is less tall than that of a DSLR and falls lower in hand. This way, the index finger and thumb naturally reach the shutter-release and top control-dial. The release itself has a short travel to a moderately soft halfway-point. A deeper press is required to release the shutter. The front control-dial is just in front and a short distance below. This dial protrudes just a little from the grip and has firm detents. There are eyelets for a camera strap on both sides and Sony thoughtfully placed the grip-side one further behind to avoid discomfort while holding the camera.
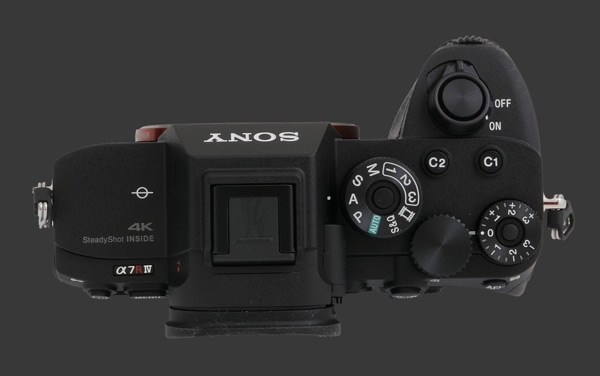
The top plate is split by a large angular electronic viewfinder housing just a little off-center from the body yet fully aligned with the optical center of the lens mount. This contrasts with the approached used on Sony APS-C models that place the viewfinder completely on the right side and level with the top plate. Above the viewfinder, there is a new Multi-Interface Hot-Shoe. It has the same form-factor as a standard hot-shoe and features an additional row of contacts below its front edge to communicate with the digital microphone mentioned on the previous page of this review.
Every control on the top plate is found to the right of the EVF. Immediately to its right, there is a Mode Dial with the standard PASM exposure modes plus a fully automatic mode, 3 custom modes, a standard Video Mode and a Slow&Quick Video Mode. Even though the dial itself has strong detents, a button in its center must be held down to turn it which completely prevents accidental changes. Program mode supports Program Shift which is activated with either the front or top control-dial. In Aperture Priority mode, the same two dials control Aperture. Shutter Priority also uses both the front and top dial to set one exposure parameter. Full Auto mode locks out EC, ISO, AEB, WB and prevents the focus area from changing.
In Manual mode, one dial sets the Aperture, the other the Shutter-Speed. Which does which is configurable on Page 9 of Camera Menu 2. The shutter-speed range stays regardless of shutter type. The last shutter-speed is Bulb which starts exposing when the shutter-release is fully-pressed and closes the shutter when released. This unfortunately introduces shake, making it impossible to use Bulb mode directly on camera. Instead, one can use any remote trigger supported by the A7R IV: Wired Remote, Infrared Remote, Bluetooth Remote and a Smartphone. The wired option requires no power and the infrared one uses very little. Note that there is only an infrared receptor on the front of the camera which limits its use. Both the stand-alone Bluetooth Remote and a Smartphone require an active connection which increases power consumption. Modern mirrorless cameras often show a countdown during long exposures but this Sony does not. Hopefully, this immensely useful and trivial feature can be added one day via a firmware upgrade.
All three custom modes serve as short-cut to several configuration memory banks. Standard Video Mode previews framing correctly and makes the camera ready to film. All PASM modes are supported with shutter-speed limited by frame-rate since each frame must be taken within that limited time-slice. This implies that faster videos require shorter shutter-speeds and, therefore, brighter light. This is an inherent limit of video.
S&Q is another Video Mode designed for accelerated and slow-motion video. It always records 1080p Full HD video. The recording frame rate can be selected from 1 to 120 FPS using standard frame rates. This unique mode lets users specify a playback speed that is different from the recording speed. Many options are available. The video speeds up or down by the ratio of of selected frame rates. On one extreme, playing back 1 FPS at 60 FPS video results in time accelerated by 60X. Going the other way, a 120 FPS capture shown at 24 FPS yields a 5X slow-motion video.
The top control-dial is literally right next to the mode dial. It is slightly elevated with nice detents that give positive feedback. Sony lets photographers choose between ½ and 1/3 EV exposure steps. Given that 1/3 EV steps are the default, everything matches perfectly in 1/3 increments. There is a real problem though when switching to ½ EV steps which are easier to work with on every other camera that supports them. There is no issue with Aperture and Shutter-Speed, since both change in ½ EV increments. This makes it simple to add to one and remove from the other to balance exposure. Unfortunately, this is not true of ISO which always works in 1/3-stops and produces exposures that fall on 1/6th of a stop!
When a button is configured to control ISO, fractional ISO sensitivities can be skipped by using the top control-dial. This is helpful at the expense of one customization point. Assigning ISO to a dial always moves in 1/3 EV stops. There should only be two scales for ISO, one that follows exposure increments and one with full-stops only. AEB settings have the same issue and remain in 1/3 EV steps instead of switching to ½EVs. Next to the top control-dial, there is a lockable dial dedicated to EC. That dial is marked ±3 in 1/3 stops. Any other value must be set using a control-dial. When the EC dial is not at the zero position, the A7R IV prevents Exposure-Compensation from being changed any other way which avoids the confusion possible on certain cameras.
A pair of customizable buttons is found behind the shutter-release. These are generically labelled C1 and C2 which can activate one of 27 pages of functions! Each page has between 1 and 6 choices which gives over 100 possibilities. The natural assignment for C2 is EC which should be nearly universal. When working with 1/2 EV steps, there is pretty much no choice but to dedicate C1 to ISO so that sensitivity can be changed in full-stops. Otherwise, Metering, DRO and either DOF Preview or Shot Result Preview are good choices. There is no way to activate preview modes without assigning them to a Custom button. The different between both types of preview is that Shot Result Preview also simulates shutter-speed and DRO, in addition the depth-of-field.
The previously described shutter-release is on top of the grip. A two-position rotating power switch surrounds it. There is strong detent to prevent accidentally turning the camera on or off. Moving the index finger from the shutter-release to either C1 or C2 is easy and comfortable. These buttons are unexpectedly sticky. Normally one presses the button while rotating a control-dial to change a setting and the camera returns to normal right after. On the A7R IV though, this does not happen and a second press of any button is needed to deactivate the customized button.

On the left side of the camera, there are 3 flexible rubber flaps, each one connected with a simple hinge about 1cm (0.8") wide. The top flap towards camera front covers a Sync-Port used to attach additional wired lighting. This is used mostly for legacy studio lighting as most are now triggered wirelessly. Towards the back, the top opening reveals 2 mini-jacks and one Micro HDMI port. The red mini-jack is for stereo input, while the black is for stereo output. Another opening covers two USB ports, a Type-C and a Micro USB. The camera can be controlled or powered by either one and even supports both functions simultaneously. The grip-side of the camera features a sliding plastic door to cover the dual SDXC UHS II memory-card slots.
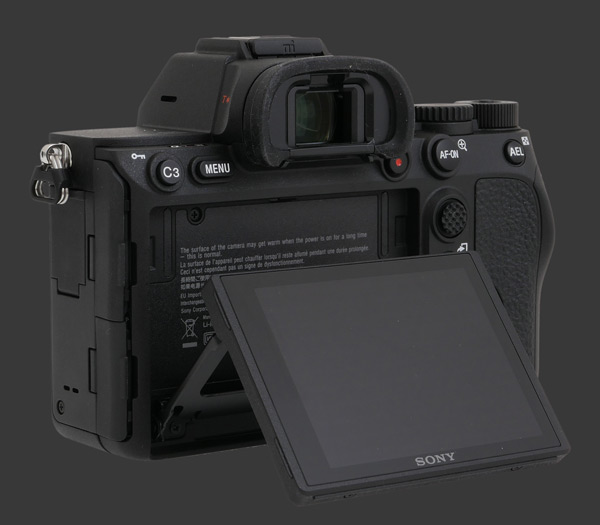
All remaining controls are found on the back of the camera. Its a fairly typical amount of controls for a high-end camera yet looks quite busy because the A7R IV is quite compact. Most of the area is occupied by a 3" Tilting Touchscreen LCD with 1.4 megapixels. The panel is sharp and refreshes quickly with little lag. Brightness can be adjusted but surprisingly not Color, even though that option exists for the EVF. Brightness can be automatic manually adjusted on a 5-point scale. At its maximum, the display is bright which helps improve visibility, particularly because the LCD lacks an anti-reflective coating.
At the top left corner of the camera, there is third customizable button labelled C3. It can be set for any of the same 27 pages of options as other customizable buttons. The operation of C3 is sticky, just like C1 and C2. One press enters a mode to change the chosen setting and a second press of any button is required to dismiss. Once activated, all three dials and the 8-way joystick control the setting. In Playback mode, C3 is used to lock images. This prevents deletion but not formatting.
A rectangular button to the left of the EVF activates the Menu system. This forces two-handed operation when changing anything that requires diving into the very complicated menu system of the Sony A7R IV. There is a tremendous amount of options split into high-level 6 tabs: Camera 1, Camera 2, Network, Playback, Setup and My Menu. Each tab groups up to 15 pages of 6 menu items! Outside of the broad subdivisions, the grouping of items is not logical. Luckily, navigation around the menu system though is extremely efficient.
This is actually the only feature where Sony took full-advantage of having triple control-dials. From front to back, control-dials move from large to granular steps:
- The front control-dial cycles over tabs. Each turn moves to an adjacent tab. Passing the last one selects the first tag and vice-versa.
- The top control-dial switches between pages across all tabs. Turning this control-dial goes to the next page of the current tab and then jumps to the first or last page of the next or previous tab, respectively, depending on the direction of rotation.
- The rear control-dial selects menu items on a single page in a cycle.
- The joystick provides a hybrid of the top and rear control dials. Vertical movement operates like the rear control-dial while horizontal movement mimics the top control-dial.
It is hard to grasp how options were distributed across the menu system. The Setup tab appears to group configuration which is not photography related, while those that are can be found in the last several pages of the Camera 2 tab. Both the Playback and Network tabs make sense though. Unlike most cameras except for Canon, pressing the right direction does not select a menu item. Instead, either the joystick or center button of the 4-way controller must be pressed. This also means that these controls cannot be used to back out from a selection. Only pressing Menu brings the user back to the menu without existing the system entirely.
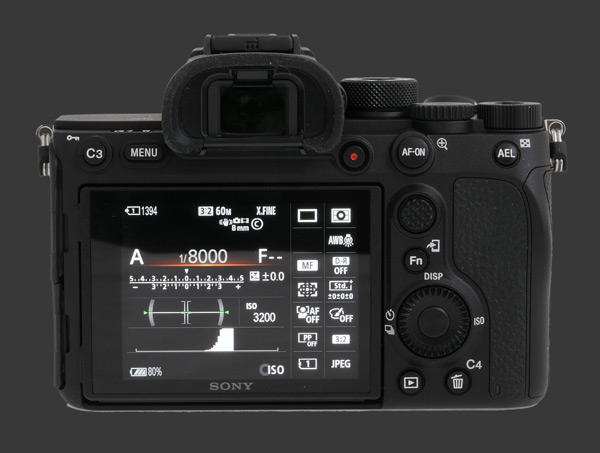
A large and extremely sharp EVF protrudes from the camera above the LCD screen. At 5.8 megapixels, this 0.5" EVF has the highest resolution on the market. Its shows 100% coverage with 0.78X magnification. Only a handful of digital cameras offer higher magnification. The view through this EVF is highly detailed, making it easy to confirm focus. It has a fast refresh rate with virtually no lag and an ultra-short blackout. The A7R IV offers an option to reduce resolution and increase refresh. Its a minor compromise that does not change much.
The view through this EVF is spectacular and without a doubt the best viewfinder experience offered by any digital camera. Looking through it shows a very natural view with really good color accuracy, nice contrast and exceptional details. When framing, the resolution is so fine that pixels are invisible to the naked eye. Upon half-pressing the shutter, the EVF temporarily amplifies gain which makes noise more apparent and details coarser. While this is unusual, it only lasts until the shutter is released.
This Sony EVF is Exposure-Priority, providing true Live-View which previews exposure, color, white-balance and contrast with good accuracy. When using a native E-mount lens, Depth-Of-Field is also constantly previewed. For other lenses, there is a DOF Preview function which can be invoked. There is an additional option to preview the effects of Shutter-Speed and Dynamic-Range Optimization, although the latter always seems to be taken into account. Having a proper exposure preview is incredibly liberating as it minimizes the need to check images for exposure.
Below the EVF, there is an essential Eye-Start Sensor with two modes of operation: One to automatically switch between the EVF and LCD. The other, automatically activates the EVF when triggered. The switch happens instantly when something gets within 3cm. The sensor itself is extremely sensitive which may cause the camera to get stuck in EVF mode. Even a light layer of fog makes it happens, so watch your breath when shooting in a cold environment. The Eye-Start Sensor can be disabled which keeps the LCD on until the camera goes into Power Saving mode. In Auto mode, tilting the LCD forces the camera LCD mode.
The Video Record button is tightly squeezed at the lower right cover of the EVF, slightly behind the soft rubber that provides padding. The button is small with a good amount of travel to not get easily triggered accidentally. Pressing it starts and stops video recording instantly. The shutter-release can optionally be configured for video recording too. Regardless, half-pressing the latter makes the camera start focusing unless either the camera or lens are in MF mode.
Continuous towards the grip-side along the top edge of the camera, there is a a large round AF-On button. Further right, near the right-side of the camera there is a smaller AE-L button. Even though both these buttons are labelled, these are just their default function as these can be customized to any of the same 100+ options as other previously described Custom buttons. Both buttons have a nice tactile feel. Directly below AF-On, there is a clickable 8-way joystick with a sharp texture to prevent slipping. The joystick moves easily in all 8 directions and it can be pressed inwards to activate a chosen Custom function. The most logical choice is to have it reset the focus area but any other frequently-used focus related function would be suitable. The joystick duplicates the behavior of the 4-way controller to navigate both the standard and Function menu.
A small round Fn button sits between the 8-way joystick and 4-way controller. In Capture mode, the Fn button toggles a highly customizable menu of 12 icons split into 2 rows. Either the 8-way joystick or 4-way controller can be used to select one of the 12 functions shown. While it is more comfortable to use the joystick, the 4-way controller has the advantage of having an embedded control-dial to change the current setting directly. Every option in this menu can be reconfigured from 15 pages of settings! These can be selected for both Stills and Video mode or separately to maximize usage.
The rear control-dial is combined with a 4-way controller just below the Fn button. The central button and each cardinal direction, except Up, has a default assignment that can be overridden. Up always cycles over display modes which is described in detail further below in this review. The 4-way controller is large with a texture around the control-dial for usability. The integrated rear control-dial is also customizable with 11 options to chose from. Most choices are not that useful due to being redundant with other control-points. The one which would be most appropriate is ISO which unfortunately is stuck in 1/3-stop increments.
One can see that the Sony Alpha A7R IV is seriously underusing a number of controls, most notable its triple control-dials. In Manual exposure mode, one can use the three control dials to change all exposure parameters and these dials are well used in the menu system too. However, two or even three control-dials do exactly the same thing for the vast majority of functions, many of which are sufficiently complex to warrant those three control-dials. Take Drive Mode for instance: Both the front and rear control-dial do the same thing which is cycling over all variations of a mode while the rear control-dial selects the actual mode. When it comes to Auto Exposure Bracketing and the Self-Timer, the camera offers a huge linear list of all permutations for number of images and step sizes or delays, instead of using one dial for each. When fine-tuning White-Balance, two dials are used which allows adjustment along 2 axis but the WB sub-type of Auto WB needs a trip deep into the menu system to change.
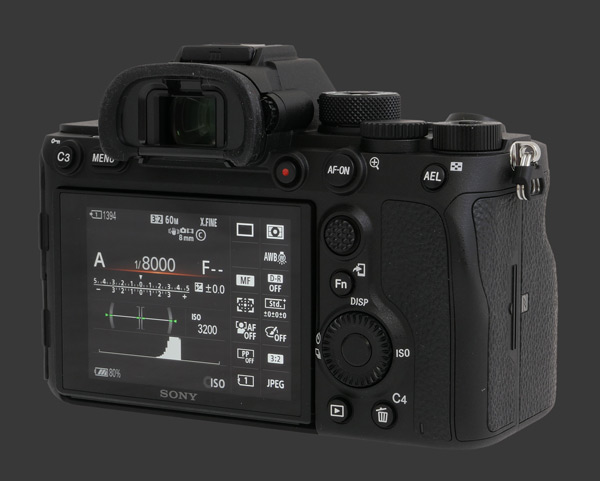
The last two remaining buttons on the camera are Playback and Delete. The former behaves exactly as expected, toggling Playback mode. The A7R IV is a shooting-priority camera and will exist Playback mode instantly when the shutter-release is half-pressed. There are some customization options for playback yet they are minimal. One can set the Fn button to enlarge the image, just as AF-On does. It would be useful buttons could be configured to overlay a histogram, show overexposure areas or jump to different magnification. While on the topic, the zoom function in Playback mode is truly backwards with AF-On zooming in and AE-L zooming out. Most cameras can easily adjust the magnification level using a control-dial but, again, this camera uses all three control-dial to change photos!
The Delete button is overloaded. In Playback mode, it prompts for deletion, just as expected. The Capture mode, Delete is customizable from 100+ settings. When navigating the menu system, Delete shows a tip for whatever is selected. These go from quite useful to a simple repetition of the setting. During Instant Review, pressing Delete does nothing until the camera has finished writing to the card. Afterwards, it prompts for deletion of the shown images. This is incredibly frustrating since an Instant Review of 2 seconds or less always disappears before the Delete button works! Despite having quite a few controls and huge number of customization feature, the A7R IV often makes things less efficient and more convoluted than they should be.
Pressing Up on the 4-way controller cycles over display modes which are set independently for Capture with EVF, Capture with LCD and Playback. Only Up cycles as pressing down invokes a different function entirely, so one must go over every possible mode before returning to the starting point. This is tedious which is why a option to temporarily overlay a histogram would be very welcome. At least, Sony allows some modes to be taken out of the cycle. There are 5 common display modes for the EVF and LCD: Graphic Display, Display All Info, No Disp Info, Histogram and Level. These are mutually exclusive, making it impossible to see the level and histogram at the same time. The first two modes listed here are overloaded with icons and guides which makes them quite distracting from images. Other modes are quite sparse and are really missing frequently changes options such as WB and AF mode.
There are two extra options for the LCD, one labelled For Viewfinder which is a status screen that includes a live-histogram and another called Monitor Off which does it means. This last one puts the camera into Auto EVF mode. The brightness of both the LCD and EVF can be changed but only the color-temperature of the EVF is adjustable. This leaves the LCD with a slight yellow tinge that cannot be compensated for. When navigating the menu system, a number of options become disabled in odd lots. The mounted lens also affects what can be changed. One instance which leads to mistakes is the Steady Shot setting which becomes greyed out when the lens has a stabilization switch. One can understand that it may be done to avoid confusion but consider what happens when changing lenses. This is crucial considering that the A7R IV does not automatically disable image-stabilization when the self-timer is engaged which is often necessary when taking photos on a tripod.
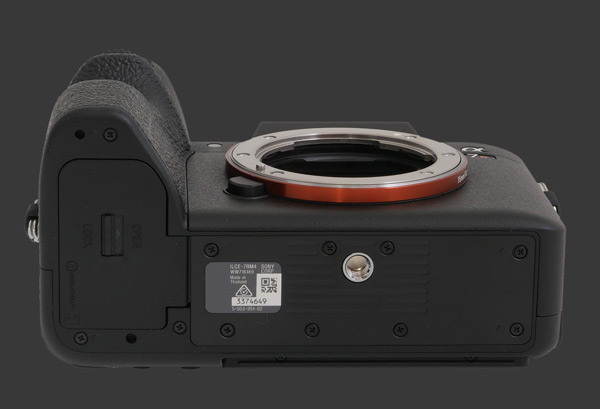
A look at the bottom plate of this mirrorless shows the same as virtually all high-end cameras. There is a metal tripod mount aligned with the optical axis of the camera which is ideal for panoramic photography. Below the grip, there is a sturdy weatherproof battery compartment door. An external latch releases the door and a small internal blue latch releases the battery.
Even though the A7R IV control layout is nearly identical to its predecessor, the revised physical buttons and dials clearly improve usability. This makes a particular difference when using the camera while wearing gloves. Every single control is is usable that way, even the combined rear-control-dial and 4-way controller due to its tilting design. The only dial that requires a little more effort than usual is the Mode Dial whose locking button must be held down while turning.
Ergonomics of the Sony Alpha A7R IV are really comfortable and its control layout is quite reasonable. Despite not having a huge feature set, this mirrorless is incredibly complex with a huge number of customization options that sometimes get disabled or cause others to get ignored. The User Manual and built-in help are only slightly useful. Luckily, Sony expert Gary Friedman published an eBook on the Sony A7R IV that explains every control, feature and option, plus offers advice and suggested settings for various types of photography. This included an entire chapter on Flash Photography, one of the hardest topics to master, plus how to use legacy glass and assemble 240 MP images from RAW files produced using Pixel Shot Multi-Shot mode.
Although this review outlines several inefficiencies in the A7R IV, there are no issues that prevent a particular photo from being made. It might take longer than ideal and there are settings that often require checking or adjustments but this mirrorless handles generally well. After all, this is not one designed for fast action photography which makes efficiency less critical.
 |
Please Support Neocamera
All information on Neocamera is provided free of charge yet running this website is a huge endeavor. Purchases made via affiliate links found throughout the site help keep it running and up-to-date. There is no additional cost to you, so please consider buying via these links to our affilates:
If you found any information on this site valuable and did not purchase via our affiliate links, please considering donating via PayPal:
Any amount will be greatly appreaciated. Thank you for your support!
Sony A7R IV Highlights

Sensor-Size: 36 x 24mm

Actual size when viewed at 100 DPI
| 61 Megapixels Mirrorless | ISO 50-102400 |
| Sony E Mount 1X FLM | Shutter 1/8000-30s |
| 5-Axis Built-in Stabilization, 5.5-Stop Improvement | Full manual controls, including Manual Focus |
| 0.50" Built-in EVF 5.8 Megapixels (0.78X) | Custom white-balance with 2 axis fine-tuning |
| Automatic Eye-Start sensor | Spot-Metering |
| Weatherproof | Hot-Shoe & Sync-Port |
| Built-in Dust Reduction | Stereo audio input |
| 10 FPS Drive, 68 Images | Lithium-Ion Battery |
| 3840x2160 @ 30 FPS Video Recording | Secure Digital Extended Capacity x 2 |
| 3" LCD 1.4 Megapixels |
Updates
2024.11.18

Best 2024 Photography Gifts for Every Budget
Great gifts for photographers and photo enthusiasts selected for every budget among the best products of 2024.
2024.08.07

Eye Protection Tips for Professional Photographers
The four main considerations for professional photographers regarding eyewear.
2024.07.14

Fujifilm X100VI Review
Flagship fixed-lens compact digital camera with a 40 MP sensor and Image-Stabilization, a first for the series. Retro design featuring dual control-dials, plus direct ISO, Shutter-Speed and EC dials. Its hybrid viewfinder can switch between EVF and OVF mode.
2024.05.09

Fujifilm GFX100 II Review
Flagship 102 Megapixels Medium-Format Mirrorless Digital Camera with 8-Stop 5-Axis IBIS, 8 FPS Drive, 8K Video and 400 MP Super-Resolution capture in a weatherproof and freezeproof body with dual control-dials and dual memory-card slots.
2024.04.03

Fujifilm X-T5 Review
Newest Fujifilm flagship boasting a 40 MP APS-C sensor, 5-axis IBIS with 7-stop efficiency, 15 FPS continuous drive, 6.2K Video capture, dual control-dials and dual SDXC UHS-II slots in a sturdy weatherproof and freezeproof body.
2023.11.20

Best Digital Cameras of 2023
Find out which are the Best Digital Cameras of 2023. All the new Mirrorless Digital Cameras from entry-level to high-end professional.
2023.07.10

Fujifilm X-H2 Review
40 Megapixels APS-C Hybrid Mirrorless Digital Camera with 7-stop IBIS. Fastest shutter ever and 8K video capture. Large builtin EVF with 0.8X magnification and 5.8 MP, plus an Eye-Start Sensor. Packed with features and large number of controls in a weatherproof and freezeproof body.
2023.05.07

Sony FE 20-70mm F/4G Review
Review of the unique Sony FE 20-70mm F/4G lens. The optical zoom of this lens spans ultra-wide-angle and medium focal-length coverage, making it one of the most versatile Full-Frame lenses on the market.
2023.01.15

Huion Inspiroy Dial 2 Review
Review of the Huion Inspiroy Dial 2 tablet, a medium sized drawing surface with dual dials and customizable buttons. Connects via USB-C or Bluetooth 5.0 with Windows, Linux and Android support.
2022.12.08

How to Pack for a Photo Trip
Find out how to pack for a travel photography trip, carry your gear safely while meeting airline regulations.
2022.11.13

Best Digital Cameras of 2022
The best digital cameras of 2022. A short list of the most outstanding models in their respective categories. Choose one for yourself or as a gift.
2022.09.21

Pentax DA* 60-250mm F/4 SDM Review
Review of the Pentax DA* 60-250mm F/4 SDM, the constant-aperture telephoto zoom with the highest zoom-ratio on the market.


