Fujifilm GFX 50S Review
Fujifilm GFX 50S Usability - How easy is it to use?
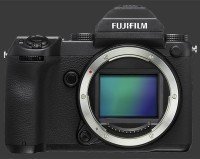
Fujifilm made the GFX-50S unlike any other digital camera on the market. When they entered the mirrorless world with their X-series of APS-C cameras, they introduced a unique fusion of digital and analog design which they have been refining ever since. The Medium Format GFX-50S is clearly a branch of the same design, scaled up according to the larger sensor and necessarily larger lens-mount.
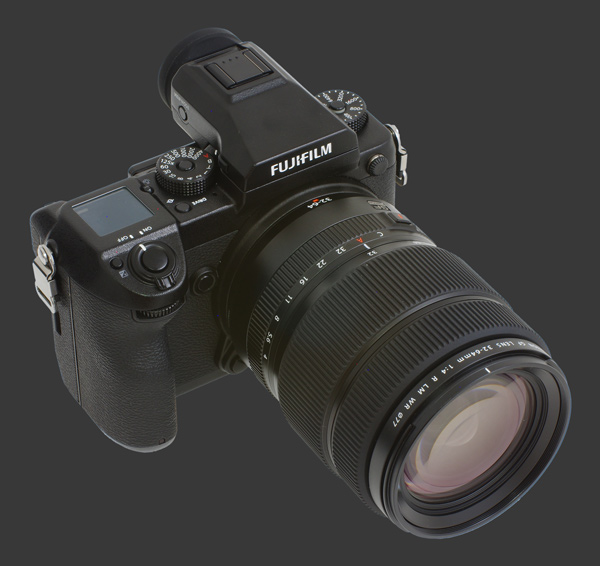
At a glance, it resembles a large Fujifilm X-T1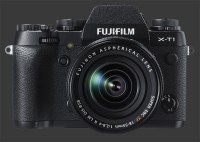
Fujifilm X-T1, sharing nearly identical dials for ISO and Shutter-Speed, plus dual control-dials. Stylistically, there is a familiarity of design and interface, although there are many differences too, such as the absence of an EC dial. Plus, the EVF is entirely optional on the GFX-50S. When fitted with just the optional EVF module, the design looks very natural. There are important disparities that must be known to understand the usability of the GFX-50S.
This Medium Format digital camera is quite large and heavy. Plus, it has a rather unusual shape. Its body has a full-height vertical grip with a nice indentation for added support. Although its top is wide, the grip is narrow for most of its height. It can be since this one - unlike most high-end cameras - does not host the battery. Instead, the battery compartment is located between the imaging sensor and back of the camera. A squarish door opens on the side opposite the grip to change batteries. This is a somewhat puzzling design which reveals that the flange distance is rather short and the entire camera could probably be much slimmer.

The camera itself feels somewhat heavy for its size but it gets really heavy with a lens mounted. The GFX-50S plus Fujifilm Fujinon GF32-64 F/4R LM WR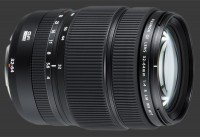
Fujifilm Fujinon GF32-64 F/4R LM WR weigh in at 1.7kg together. Fujifilm fitted this camera with two very sturdy-looking connectors for a neck-strap. Unfortunately, when down one of them blocks the opening of the memory compartment door. One must lift it up with one hand while releasing the latch to access memory-cards. The optional yet essential EVF adds more weight to the whole package and the tilting adapter increases it further. The camera comes with a nicely cushioned neck-strap to help support all that weight.
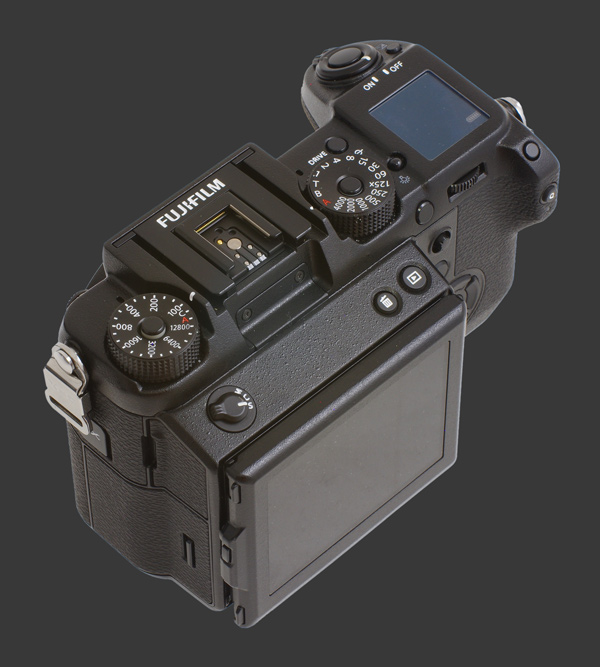
The top of the camera looks different depending on how it is accessorized. At its bare minimum, the hot-shoe takes up a good chunk of the top plate. In the center, there is a hot-shoe with a 3-sided edge which is framed by two railings used to keep the optional EVF in place. It connects through electric contacts under the front-edge of the standard hot-shoe. An angled plastic-plate is provided to hide this when no EVF or flash is mounted. This makes the top look cleaner but there is no weather-sealing around there, so having those electric contacts exposed is worrisome.
The optional EVF clips into railings on each side of the hot-shoe. It protrudes nicely from the back of the camera for comfort while obstructing the rear LCD screen when viewed from a high angle. There is a nice soft rubber eye-cup around the viewfinder. The EVF module has a standard hot-shoe, which finds itself further back than the one on the camera. A typical plastic cover is provided to keep it protected. A pair of buttons must be pressed simultaneously to release the EVF unit. One can also add a Tilting Adapter between the camera and EVF. This makes the whole thing taller, heavier and protrude much more from the back. Although this obstructs further the rear LCD, the adapter allows the EVF to tilt upwards 90° and rotate 45° towards either side. Using the tilt adapter is a wonderful experience. While being used to slouching or crouching to see through a viewfinder, it was second nature to keep doing so. Making an effort to start using the tilt and rotation feature made shooting more comfortable and less strenuous. It also makes framing easier.
The EVF itself provides a large 0.85X magnification and 100% coverage view through the lens with a class-leading 3.7 megapixels of resolution. Everything is sharp, although the difference between it and high-end 2.4 megapixels ones is hard to tell. When focusing manually, feedback is quick although the point of critical focus is not so easy to pinpoint, perhaps because of the way pixels are binned to produce the Live-View. There are many overlays that can be customized, including a single-axis digital level. Most importantly, the EVF and LCD provide an Exposure-Priority view half the time. It seems that P and M get Exposure-Priority but A and S do not. This is indeed very odd. At least EC and WB are previewed correctly.

Most controls are visible from the top of the camera, even those technically not on the top-plate. It is fairly clear that this Medium Format is designed to be used on a tripod and operated from above. This makes it somewhat harder to operate at eye-level, but so does its weight. Starting from the left side of the top-plate, the Fujifilm GFX-50S offers the following controls:
- ISO Dial: A lockable ISO dial is labelled with sensitivities from ISO 100 to 12800, plus an A and a C position. Within the shown ISO range, sensitivities can be selected in 1/3-stops. The A position is for Auto ISO. One can select from three user-configured ISO setting, each specifying a default sensitivity, a maximum one and a minimum shutter-speed. Auto ISO can select any standard ISO when limits are set appropriately. The C position is for Custom ISO. This passes control of ISO to the front control-dial. It is also the only way to select an Expanded ISO setting: 50, 25600, 51200 and 102400. When the front control-dial also has another setting to control, it can be pressed to toggle between settings. A central push-button can lock the ISO dial in place. Press once to lock, press again to unlock.
- Shutter-Speed Dial: A Shutter-Speed dial uses the same lockable system as the ISO dial. The dial works exactly as it does on other X-series cameras. It is marked in full-stops from 1/4000s to 1s with 3 additional positions: A, B and T. To select a 1/3-step shutter-speed, one must rotate the Shutter-Speed dial to the closest full-stop and use the rear control-dial to offset it ±2/3 EV. The A position makes shutter-speed selection automatic, so to enter either Program or Aperture-Priority mode, depending if the lens aperture-ring is set to A or not. The B position is for Bulb exposures which can reach one hour. Press the shutter-release once to start and again to stop. Alternately, one can use the T position which allows one to dial-in any exposure time using the rear control-dial from 1/16000s to 60s in 1/3-stops and from 60s to 60mins in full-stops. This is the only way to use electronic-only shutter-speeds, 1/16000-1/4000s, when Electronic-Shutter is enabled. It is also the most efficient way to control shutter-speed, since only one control is needed to select any speed.
- Illumination Button: A tiny hemispherical button can be pressed to invert colors on the monochrome status screen to its right. It goes back to normal after a few seconds or after pressing the button again. While both dials are easy to use with gloves on, this button is not.
- Drive Mode Button: A small round button, flush with the surface of the top-plate, brings up a menu to change drive modes. The menu offers 9 choices and can be navigated either with the 4-way controller or the focus-point joystick. While it does wrap around, passing over the last option, which is Movie mode, incurs a delay while the camera gets ready to record video. This the most poorly-placed button on the camera and absolutely requires activating it from above without gloves on.
- Fn3: A customizable button is almost on the top-plate, hanging off the protrusion to secure the thumb. This one is round and flush with the surface too. It can be configured to activate one of 36 functions, including several such as the Dual-Axis Digital-Level that cannot be accessed without assigning a Function button to it.
- Shutter-Release: A standard two-stage shutter-release with average travel and a firm halfway point is found angled downwards on top of the grip. It is a good size and comfortable to reach. Around it a rotating power-switch has the two obvious positions.
- EC Button: There is an absolutely miniscule EC button squeezed on top of the grip, to the right of the shutter-release. While having a button at all rather than a dial is a big change compared to the X-T1 and X-T2, the size and placement of this button is surely to be the most criticized design issue of the GFX-50S. It simply makes Exposure-Compensation too difficult to use for what is arguably one of the most commonly used functions on any digital camera.
The protruding back of the GFX-50S offers three more controls that are mostly visible from the top. On the left, there is a simple 3-way rotating switch to select between AF-S, AF-C and MF focus modes. It works exactly as expected and a tab on it makes it possible to use while wearing gloves. On the left, there is a small round button for Delete and a slightly larger one for Playback. One cannot delete from the Instant Review but, from there, it is possible to enter Playback mode and then delete. When shooting with 2 SDXC cards in Backup mode though, the Delete button only deletes the image from one card, making it rather cumbersome to remove poor shots. These three controls force the camera to be used from above. since they are difficult to reach otherwise.
The top-plate has an excellent and highly versatile monochrome Status Screen. This LCD can display 4 rows of numbers plus one row of 4 icons. There are 7 options for each number row and 13 options for each icon. This is very useful information that allows important camera settings to be seen from on top. When the camera is powered off, the Status Screen remains on to display memory-card and battery information. It appears to consume a non-trial amount of energy. When putting the camera away for a while, it is best to pull-out the battery.

Sides of the GFX-50S are somewhat unusual. The left side is almost entirely covered by three rigid plastic doors. The top two are held in place by rubber links that do not look durable. Behind the upper-left door, there is 15V DC Input connector, a standard-size USB 3.0 female connector, a 2.5mm wired-remote connector and a MicroHDMI female connector. This door has a nested door, marked with the GFX logo, also held by a rubber link, to access the wired-remote connector alone. The upper-right door, reveals two stereo mini-jacks, one for input and one for output. The lower door is made of plastic and connected to the camera with a slightly flexible hinge. The edge of the door is weather-sealed to protect the battery which goes inside.
The right side of this camera has an odd shape. Towards the front, one can see the grip with its deep indentation which works well to support a camera this heavy. In the middle, there is a door which nearly takes the full-height for the body. This plastic door has a strong hinge that is weather-sealed, like the battery-compartment door. Behind it, there are two offset slots supporting SDXC UHS-II cards, being also obviously downward compatible with SDXC, SDHC and SD cards. A smaller and slightly lower door would have prevented the strap lug from blocking it most of the time.

There are plenty of controls the back of this Medium Format Mirrorless Digital Camera. Most of the space is dominated by a large 3.2" LCD mounted on a triple hinge. Two of those allow the monitor to tilt up and down. A third one lets it tilt to the right. While we worry about the durability of so many moving parts, these hinges are among the strongest on any camera. The screen can flip upwards 90°, downwards 45° and sideways 60°, giving it quite a lot of flexibility while remaining relatively sturdy. Just above the screen we can see the three controls described earlier.
To the right of the screen, starting from the top, there is an unmarked round button which is referred to as Fn4 which can take on one of 36 functions: EC, Image Size, Image Quality, RAW Toggle, Film Simulation, Grain Effect, Color Chrome Effect, Dynamic Range, White-Balance, Select Custom Setting, Focus Area, Focus Check, AF Mode, Rapid AF, Face/Eye Detection Settings, Self-Timer, AEB, Metering Called Photometry by Fujifilm, Shutter Type, Auto ISO Setting, Wireless Communication, Flash Function Setting, TTL-Lock, Modeling Flash, Mic Level Adjustment, Depth-of-Field Preview, Preview Picture Effect, Histogram, Electronic Level, AE-L, AF-L, AE/AF-L, AF-On, Lock Settings or Playback. This is a huge list of features which can be assigned to any of the 9 function buttons, plus the rear control-dial of the GFX-50S.
Having that many options to choose from and the flexibility to assign them to so many buttons is extremely welcome. There are plenty of features there that can only be accessed through a customizable button, notably EC, Focus Check, TTL-Lock, Modeling Flash, DOF-Preview, Electronic Level, AE-L, AF-L, AE/AF-L and AF-On. That is 10 feature for 9 buttons! Only one needs to be left behind. Should there be more features that a particular photographer does not use, remaining buttons can be used to speed up access to features which are available through the menu system. We highly recommend AEB, Metering, WB and Self-Timer.
Only Fn1 is labelled, as it is the default EC button. Any other assignment must be memorized, since the camera does not show which except in the Setup -> Button/Dial Setting -> Function (Fn) Setting menu which is three levels deep! One can start with some obvious assignment based on how other cameras are typically laid out:
- Fn1 to EC, obviously since it is already labelled. Although that tiny button is uncomfortable to use, the only other button that is usable with EC is Fn2. No other assignment works since the rear control-dial must be used for Exposure-Compensation.
- Fn2 to DOF-Preview. That is where dedicated buttons are almost always located, so it should be intuitive.
- Fn3 to Electronic Level since this is the easiest button to reach with the camera at eye-level. Any other button would force the photographer to move the camera while attempting to level it. There is also a Live Histogram option which is somewhat useful. It shows RGB histograms for the preview. Sadly, it disappears as soon as EC is activated, meaning than any corrections to the histogram must be done blindly. Hopefully Fujifilm can correct this via a firmware update.
- Fn4 to AE-L or AF-L or AE/AF-L, depending on the preference of the photographer. Fn4 is ideal for a frequently used option as it is the most comfortable function button.
- Fn5 to AF-On or AF-L. Again, depending on preferred workflow. AF-On is known as Back-Button Focusing and provides a slight better workflow than AF-L. It makes sense to have a focus-related feature assigned here since this button is the closest to the 8-way focus-joystick.
- Fn6 - Fn9 have no intuitive assignments. On certain cameras, these buttons are labelled, so one can use that as inspiration. Features that are highly useful there are: Self-Timer, AF Mode, WB and AEB Settings. Some of these can be accessed via the Quick Menu described below but it is faster to use these buttons, so choose your favorite functions wisely!
Clicking the rear control-dial can also be assigned to any of the 36 features listed above. With the suggested assignments, the crucial one that is left is Focus Check. This feature magnifies the focus area to determine if critical focus is achieved. On a Medium Format camera where depth-of-field can be so shallow and resolution is very high, this is one of the most important features. Note that this is not necessary in Manual Focus or DMF mode since one can enable MF Assist which does it automatically. It also only works in Single-Point AF mode.
Next to Fn4, one can see the slim rear control-dial. It actually looks out-of-place on this camera, given that it is small, slim and finely textured. The dial has reasonable detents and is clickable. It is slightly uncomfortable to use due to its proximity to the thumb-book but it would be difficult with gloves on since it does not have much grip to it. This control-dial is used to select 1/3-stop shutter-speeds. It can also scroll the menu or change settings in the Quick Menu. Since 1/3-stop shutter-speeds must be selected here, it cannot control another exposure parameter such as ISO when set to C. This forces the front control-dial to toggle between aperture and ISO control when both are set to C. Speaking of the front control-dial, it looks and feels exactly like the rear one.

Going down on the body along the right edge of the LCD screen, the first control is an 8-way focus-joystick. This small and rather pointy joystick moves the focus-point or focus-area almost anywhere around the screen. It can be pressed to show all available focus-points. In that state, rotating either control-dial changes the size of the focus-point or area. In point mode, there are 6 sizes to choose from, corresponding to a single-point or a grid from 1x1 to 6x6 points. In zone mode, there are 3 sizes: 3x3, 5x5 or 7x7 grids. When pressed twice, the 8-way focus joystick centers focus.
Below the 8-way focus-joystick, there is a round unlabeled Fn5 button. Below it is a standard 4-way controller with central OK button. Each direction is an assignable button from Fn6 to Fn9. The 4-way controller is used to navigate the menu but so can the 8-way focus-joystick. Further down, there is DISP/BACK button. It cycles over display options in both Capture and Playback mode, while going up one level when navigating the menu system. The final button on the back is at the upper-right edge of the camera. This Q button brings up a 4x4 grid of settings, mostly image parameters: Custom Config, AF Mode, Dynamic-Range, WB, Noise-Reduction, Image Size, Image Quality, Film Simulation, Highlight Tone, Shadow Tone, Color, Sharpness, Self-Timer, Face-Detect, Flash Function and LCD Brightness. One uses the joystick or 4-way controller to select an option and the rear control-dial to change it.

The bottom of the Fujifilm GFX-50S provides a large surface area with a metal tripod mount perfectly aligned to the optical center. There is only a small rubber panel covering some contacts. This rubber panel is maintained there by pressure alone, so expect it to get lost quickly.
In terms of ergonomics, the Fujifilm GFX-50S is literally a handful. The camera is quite bulky and seems to be made with that intention! The EVF module merges well with the overall shape yet, when the tilting adapter is added, sticks out considerably. With a built-in tilting EVF, a lot of total space would have been most likely saved. One can use it without and EVF but it is never comfortable nor easy to frame precisely using the rear LCD.
Overall, the GFX-50S brings a lot of controls directly to the photographer, with very little need to enter the menu system once the camera is configured to your liking. Despite such a large body and impressive number of controls, many are oddly uncomfortable. The tiny EC button is one of them but the rear control-dial is also difficult to reach due to the large protruding thumb-hook next to it. The two-dial system to dial-in shutter-speed is still as cumbersome as on the X-T1. Ergonomics would be better if they forgot about it, dedicated the rear control-dial to shutter-speed and replaced the Shutter-Speed dial with one for EC. A similar complaint applies to the ISO dial that hides expanded settings because it ran out of space. Instead, a full-stop ISO dial covering the entire sensitivity range would have been much better.
As stated in the first page of this review, the Fujifilm GFX-50S would work extremely well in a studio, preferably on a tripod. Its layout is really meant to be used from above. At eye-level, accessing the Drive button or any of the ones above the rear LCD is simply uncomfortable. Considering how heavy it gets with a lens attached, this is not a camera that invites hand-held shooting which is why the EVF Tilting Adapter suits it so well. It allows to put your eye to the GFX-50S from above and be immersed in the large and sharp view provided by the EVF.
 |
Please Support Neocamera
All information on Neocamera is provided free of charge yet running this website is a huge endeavor. Purchases made via affiliate links found throughout the site help keep it running and up-to-date. There is no additional cost to you, so please consider buying via these links to our affilates:
If you found any information on this site valuable and did not purchase via our affiliate links, please considering donating via PayPal:
Any amount will be greatly appreaciated. Thank you for your support!
Fujifilm GFX 50S Highlights

Sensor-Size: 44 x 33mm

Actual size when viewed at 100 DPI
| 51 Megapixels Mirrorless | ISO 50-102400 |
| Fujifilm G Mount 0.8X FLM | Shutter 1/16000-3600s |
| 0.50" Optional EVF 3.7 Megapixels (0.85X) | Full manual controls, including Manual Focus |
| Automatic Eye-Start sensor | Custom white-balance |
| 2 Axis Digital Level | Spot-Metering |
| Weatherproof down to -10C | Hot-Shoe & Sync-Port |
| Built-in Dust Reduction | Stereo audio input |
| 3 FPS Drive, Unlimited Images | Lithium-Ion Battery |
| 1920x1080 @ 30 FPS Video Recording | Secure Digital Extended Capacity x 2 |
| 3.2" LCD 2.4 Megapixels |
Updates
2025.01.18

Fujifilm GFX 2025 Lens Roundup
Lens Review roundup of Fujifilm GFX Medium-Format lenses. Quality, performance and handling of the GF20-35mm F/4R WR, GF30mm F/3.5 Tilt-Shift and the GF55mm F/1.7.
2024.11.18

Best 2024 Photography Gifts for Every Budget
Great gifts for photographers and photo enthusiasts selected for every budget among the best products of 2024.
2024.08.07

Eye Protection Tips for Professional Photographers
The four main considerations for professional photographers regarding eyewear.
2024.07.14

Fujifilm X100VI Review
Flagship fixed-lens compact digital camera with a 40 MP sensor and Image-Stabilization, a first for the series. Retro design featuring dual control-dials, plus direct ISO, Shutter-Speed and EC dials. Its hybrid viewfinder can switch between EVF and OVF mode.
2024.05.09

Fujifilm GFX100 II Review
Flagship 102 Megapixels Medium-Format Mirrorless Digital Camera with 8-Stop 5-Axis IBIS, 8 FPS Drive, 8K Video and 400 MP Super-Resolution capture in a weatherproof and freezeproof body with dual control-dials and dual memory-card slots.
2024.04.03

Fujifilm X-T5 Review
Newest Fujifilm flagship boasting a 40 MP APS-C sensor, 5-axis IBIS with 7-stop efficiency, 15 FPS continuous drive, 6.2K Video capture, dual control-dials and dual SDXC UHS-II slots in a sturdy weatherproof and freezeproof body.
2023.11.20

Best Digital Cameras of 2023
Find out which are the Best Digital Cameras of 2023. All the new Mirrorless Digital Cameras from entry-level to high-end professional.
2023.07.10

Fujifilm X-H2 Review
40 Megapixels APS-C Hybrid Mirrorless Digital Camera with 7-stop IBIS. Fastest shutter ever and 8K video capture. Large builtin EVF with 0.8X magnification and 5.8 MP, plus an Eye-Start Sensor. Packed with features and large number of controls in a weatherproof and freezeproof body.
2023.05.07

Sony FE 20-70mm F/4G Review
Review of the unique Sony FE 20-70mm F/4G lens. The optical zoom of this lens spans ultra-wide-angle and medium focal-length coverage, making it one of the most versatile Full-Frame lenses on the market.
2023.01.15

Huion Inspiroy Dial 2 Review
Review of the Huion Inspiroy Dial 2 tablet, a medium sized drawing surface with dual dials and customizable buttons. Connects via USB-C or Bluetooth 5.0 with Windows, Linux and Android support.
2022.12.08

How to Pack for a Photo Trip
Find out how to pack for a travel photography trip, carry your gear safely while meeting airline regulations.
2022.11.13

Best Digital Cameras of 2022
The best digital cameras of 2022. A short list of the most outstanding models in their respective categories. Choose one for yourself or as a gift.


